Introduction
The HQS Modeling Assistant is a virtual assistant to improve your interaction with our HQStage modules. It leverages Large Language Models (LLM) and allows the user to interact with our software via natural language, completely abstracting the underlying complex data structures and interfaces of its functionalities, allowing the user to talk about the fundamental science, instead of focusing on the specifics of the input of a certain software. For installation instruction please visit the basic usage section of the HQStage documentation.
The HQS Modeling Assistant can take several forms, but for now it is available as Jupyter Notebook Assistant, since all HQStage modules are used from within a Python programming environment. The Notebook Assistant provides a chat-widget within Jupyter notebooks. Via this chat, the assistant can help you learn about the functionality of our modules, as well as directly interact with the code cells in the notebook and execute code.
The Modeling Assistant is powered by the LLMs provided by OpenAI. For the installable version this requires an individual OpenAI API key. Please refer to the usage section for further instructions. To get the most out of using the Modeling Assistant, we have put together a few tips in the chapter on prompt engineering. While LLMs offer tremendous potential, they also present challenges, such as copyright issues related to training data and the phenomenon of hallucinations. The Modeling Assistant addresses the issues associated with hallucinations by integrating additional tools that enable verification of data structures and facilitate the execution of actual mathematical calculations to provide a powerful virtual assistant.
The development of the HQS Modeling Assistant was done with the goal of improving the user experience of our own software. However, the software architecture is general. If you are interested in building an assistant for your (scientific) software based on our Modeling Assistant to improve the user experience, please contact us at info@quantumsimulations.de.
Prompt Engineering Tips
Prompt engineering is a technique used in natural language processing and machine learning to design effective prompts for generating desired outputs from large language models (LLMs). It involves crafting specific instructions or queries that guide the model towards producing desired responses or completing specific tasks. By carefully designing prompts, researchers and engineers can improve the performance and control of generative AI.
Thus, knowing prompt engineering techniques can directly improve the performance of the Modeling Assistant (MA). Here, we list a few techniques to keep in mind when using our tools
Define a persona
Instruct the MA to take over a specific persona. These personas are already tuned in our Assistants, but it could be useful to give additional specific instructions for particular cases.
Example
You are an expert in the field of condensed matter physics and....
Templates
Using predefined templates with placeholders can help structure the prompt and guide the model's response. These templates can ensure consistency.
Example
In the following, when talking about users, always format output this way:
```
user: {username}
age: {age}
profession: {profession}
```
Examples
Using examples in your question can considerably improve the output's quality.
Step-by-step
Breaking down complex questions into smaller ones is often helpful to get better answers.
Example
Instead of
"What is the sum of all positive integers lower than 10 which are divisible by 3?"
use
"What are the numbers below 10 that are divisible by 3?"
and after the first answer
"Add them up."
Chain-of-thought
Simply asking the LLM to show you the reasoning behind a certain answer improves the quality of the output.
Example
"How do I write a unit test for Python? Explain step by step"
Jupyter Notebook Assistant
HQS Modeling Assistant as a Jupyter Notebook Assistant aids users in the creation of notebooks. We will refer to this form of the HQS Modeling Assistant simply as Notebook Assistant.
In short, the Notebook Assistant provides a chat interface next to the notebooks which the users
can use to interact with it. Apart from answering general questions, the Assistants bring
additional tools to the table. Assistants can, for example, generate and run code directly in your
notebook, interact with the different variables you have initialized, see the code you have
run and suggest changes or generate additional code based on it. Moreover, the Assistants can
specialize in different scientific software and provide an interface to it, supporting the user
with initializing relevant data structures and setting up and running calculations.
The available Jupyter Notebook Modeling Assistants are
Notebook Assistant: the general assistant who is not specialized in any scientific software and can be used for general purpose coding.Noise App Assistant: an assistant capable of interfacing with theHQS Noise Appand provide the most important functionalities.Qorrelator App Assistant: an assistant capable of interfacing with theHQS Qorrelator Appand provide the most important functionalities.
Usage
After installing a Notebook Assistant we need to provide it with an OpenAI API key before being
able to use it. To create an API key, one should set up an account on
OpenAI. Once the key has been created, it can be set to be used
by the Notebook Assistant by running
export OPENAI_API_KEY="<openai_key>"
in the environment in which the assistant is installed. Once this is done, we can simply spin up a Jupyter Lab Server by running
jupyter lab
This will start the server and, from the browser interface, we will be able to use the assistants from within a notebook by running the cell
import notebook_assistant
The same applies for all different flavours of the Notebook Assistant. This command will make a button appear in the top right corner of the interface and, by clicking it, we can open the tab in which the chat with the Assistant takes place.
Interface
In this section we quickly go through the interface of the Notebook Assistant.
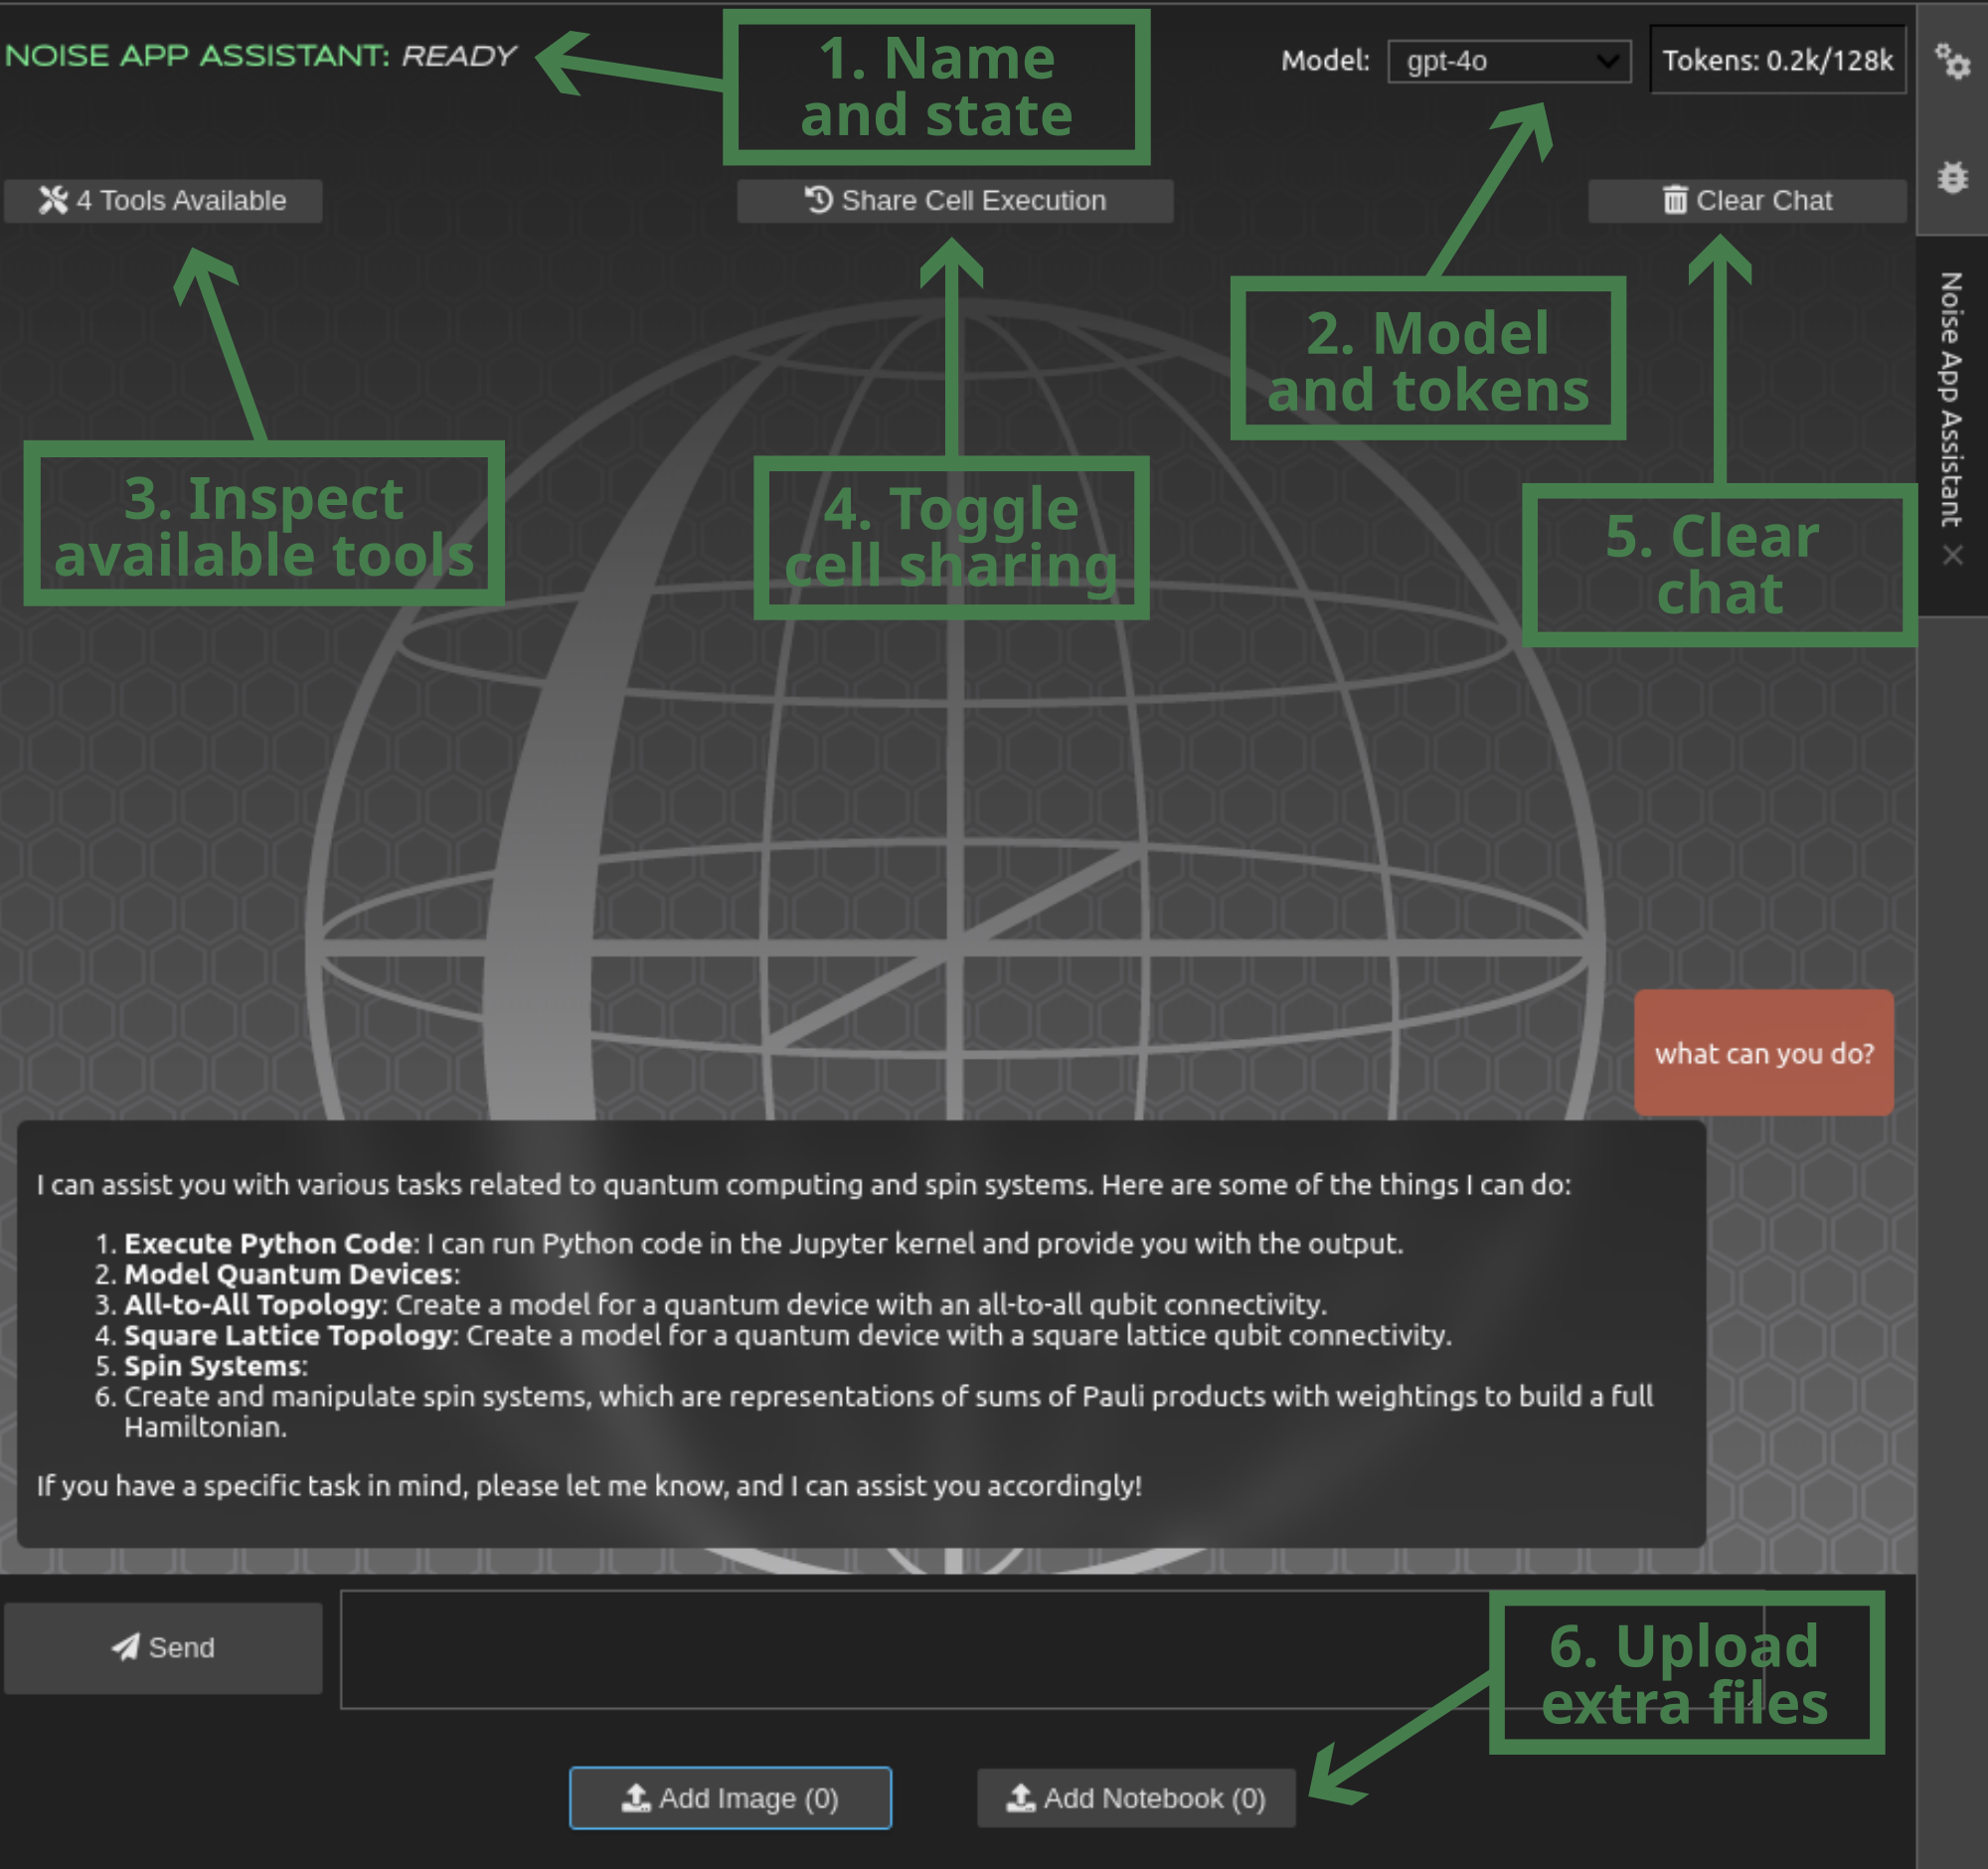 In the figure we highlight important features of the interface:
- Name and state: Here the name of the assistant as well as its state is shown. This informs us about what the assistant is currently doing, whether it is ready for our messages or busy or if an error occurred.
- Model and tokens: Here we can see which LLM is being used in the backend as well as the token count of the current conversation. Only a certain number of tokens (rule of thumb 100 tokens = 75 words) can be "seen" all at once by LLMs, so here we show how much of the total context is being used.
- Inspect available tools: A collection of all tools known by the Assistant together with their details, i.e. what they encompass and their structured form.
- Toggle cell sharing: Controls whether or not to allow the assistant to see our cell execution history. Only cells executed (not just written!) before sending a message are seen.
- Clear chat: Erase message history and everything associated with the current session of the Notebook Assistant and start fresh.
- Upload extra files: Users can upload images as attachments to their message, for example to ask the assistant to implement a formula from a screenshot or to ask a question to a section of a scientific paper. Additionaly, it is possible to upload a whole notebook to allow the assistant to see it and, for example, suggest edits or come up with a similar scientific example using the original one as inspiration.
Examples
In the following are some videos showcasing the usage of the Jupyter Notebook Assistant.